8 Smartphone Photography Mistakes Everyone Makes (and the Easy Fixes You’ll Wish You Knew Sooner)
September 15, 2025
Let’s be honest: how many times have you taken 10 shots of your coffee only to end up with… a beige blur? Or snapped a “candid” of your friend that looks more like CCTV footage than Instagram-worthy content?
Smartphone cameras today are powerful — but if your photos still feel “off,” it’s rarely the phone’s fault. It’s usually a handful of sneaky mistakes that almost everyone makes (and luckily, they’re super easy to fix).
Here are 8 common smartphone photography mistakes — and how to turn your “meh” shots into scroll-stoppers.
1. Zooming In Like It’s a Telescope
The Mistake:
You pinch to zoom, thinking you’re getting closer, but all you’re doing is blowing up pixels and losing detail. The result? A blurry, grainy mess.
“Zoomed in so much, I can see my past mistakes.“
The Fix:
If your phone has multiple lenses (like 2x or 3x zoom), use the actual zoom button, instead of pinching to zoom.
Or take the photo normally and crop it later. Your image will stay much cleaner.
Pro tip: Don’t be afraid to “zoom with your feet.” Move physically closer to your subject if you can.
2. Shooting with Dirty Lens
The Mistake:
You’re snapping pics at brunch, but everything looks foggy or soft. That’s probably fingerprints, pocket lint, or last night’s burger grease. As your phone lives in your pocket, bag, or hand, the lens easily gets smudged. This leads to hazy, blurry, or low-contrast photos.
“Me, cleansing the sins of 10,000 selfies and snack-finger smudges.”
The Fix:
Wipe your lens with a soft, clean microfiber cloth before shooting.
Be gentle! Avoid using rough materials that could scratch the lens.
Pro tip: Make cleaning lenses a habit — like checking your mirror before a selfie.
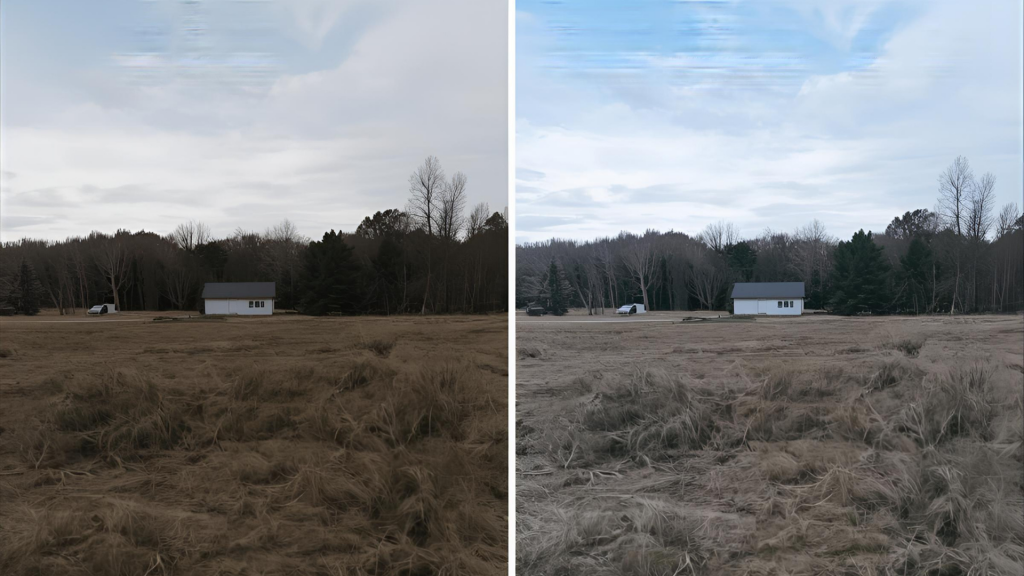
3. Ignoring the Lighting
The Mistake:
If your photos look dark, grainy, or just “meh”, that’s probably bad lighting — especially in bars, dim rooms, or when the sun’s behind your subject. Smartphones struggle in poor lighting. Taking photos in low light without thinking about the light source can lead to grainy, dull, or washed-out images.
“Tried to take a pic of the building. Accidentally opened a portal to heaven.”
The Fix:
Natural light is your best friend. Try to shoot near windows or outdoors.
Avoid having the light behind your subject unless you want a silhouette.
Use your phone’s exposure adjustment (tap and slide up/down on the screen) to manually control brightness.
Pro tip: Golden hour (just after sunrise or before sunset) is a cheat code for great photos.
4. Overusing Filters and HDR
The Mistake:
We’ve all been there — you slap on a dramatic filter thinking it looks cool, but suddenly your skin’s orange, the sky’s neon blue, and everything feels… fake.
“Nature, but make it radioactive.”
The Fix:
Use filters sparingly to enhance, not replace, good lighting and composition.
Turn off HDR when shooting high-contrast scenes where you want dramatic shadows or highlights.
Consider editing your photos manually for more control (apps like Snapseed or Lightroom Mobile are great for this).
Pro tip: Less is more. A little brightness and contrast tweak can do wonders.
5. Poor Composition
The Mistake:
Your subject is awkwardly cut off, dead center with tons of empty space, or not standing out. This, without intent, can lead to weak composition.
“Everyone’s in the photo… technically.”
The Fix:
Use the Rule of Thirds: Turn on your phone’s gridlines in camera settings. Or imagine a tic-tac-toe board and place your subject along those lines or intersections.
Play with angles: Shoot from high above, low down, or from the side.
Fill the frame when appropriate — get closer or crop later.
Pro tip: Take a few versions. You can always choose the best later.
6. Motion Blur from Shaky Hands
The Mistake:
Blurry shots like when your friend’s blowing out candles and all you captured was a streak of light instead of a face. Even a tiny hand movement can ruin a great photo, especially in low light or when using slow shutter speeds.
“When the subject is steady, but your soul isn’t.”
The Fix:
Hold your phone with both hands and steady your elbows against your body or a surface.
Use burst mode or a self-timer to reduce shaking from pressing the shutter button.
Consider using a small tripod or smartphone stabiliser for extra support.
Pro tip: Prop your phone on a coffee cup, water bottle, or backpack if you don’t have a tripod.
7. Forgetting to Focus
The Mistake:
Your camera focused on the background instead of your subject, and now your cat’s nose is sharp, but the rest is a blur. If you don’t tap the screen to focus, your camera might focus on the wrong part of the scene, leading to blurry or confusing photos.
“Autofocus: not found.”
The Fix:
Always tap on your subject to set the focus.
On most phones, you can also adjust exposure right after focusing by sliding your finger up or down.
Pro tip: Lock focus/exposure (tap and hold) if your subject is moving.
8. Editing Way Too Much or Not at All
The Mistake:
You either post photos straight from the camera (and they fall flat), or you crank the saturation to 200% and call it a day. Relying solely on your phone’s default processing can result in uninspiring images.
“This is what happens when you either fear editing or absolutely fear not editing.”
The Fix:
Try free apps like VSCO, Snapseed or Lightroom Mobile to fine-tune brightness, contrast, sharpness, and colour.
Don’t overdo it! A light touch often works best.
Pro tip: Save your favourite edit settings as presets to keep your style consistent.
Before You Snap Again
At the end of the day, you don’t need pro gear or complicated settings to take photos worth keeping. It’s the little things — like wiping your lens, tapping to focus, or stepping into better light — that make the biggest difference.
So whether you’re snapping your dog’s nap pose, showing off your #OOTD, or just trying to get a family shot where no one’s blinking — these fixes will help your smartphone photos actually look like the moments you’re capturing.
Ready to really sharpen your skills? Enroll in our smartphone photography classes and start turning casual snaps into photos you’ll be proud to share (and maybe even frame).